I’ve been into photography for several years. I tried the beta for Lightroom, gave some spins (for a few months) to Aperture and ended up sticking with Lightroom as soon as it hit the shelves. Something that I always wanted to do was try tethered photography. The USB cable that comes with the camera is short, so one of my Christmas gifts was a 10′ cable (like this one) and I was happy I could finally step away from the mac to take pictures tethered. I’m a Lightroom and Canon user, so the screenshots are for those two brands. I’ll also describe the Nikon alternative. If you’re an Aperture user, you can take a look at this Apple UK tutorial or this post from O’Reilly for reference.
The first thing I did, was installing the applications from the Canon CD, which comes with your camera. Make sure to go to the Canon Downloads Library to get the latest version of the software (and while you’re at it, check if you’re missing a Firmware update for your camera). If you use Nikon, you can get the Capture NX2 from Nikon at $ 129. First, you need to get some settings tweaked:
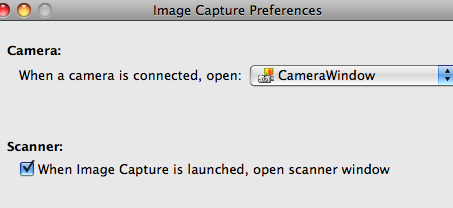
This is for both Nikon and Canon users. First, with your camera connected with the USB cable, go to your Applications folder and launch Image Capture. There, under Camera, when a camera is connected, open “Camera Window”.

And under the preferences (with the camera still plugged) you can make the settings are like the picture showing bellow. This will allow you to control certain options: After I download the pictures from the camera, I delete them from the card, I like the additional info to the Finder items and I’d rather have the ColorSync Profile (Camera RGB).

This is for Canon users. Nikon users can look at this post from Scott Kelby. Then, you have to set the EOS Utility Settings.
First, the Basic settings, specially the Start up action needs to be on Show Window. I also unchecked the Auto power off, since it’s not usually that I’ll have the camera connected for long periods of time to the mac.

Then, you need to choose a Destination folder. Since I’m very keen of keeping my desktop clutter free, I created a Remote Shooting folder inside my Pictures folder. I chose not to create folders by date, since I will move them to my Lightroom Library afterwards.

One setting I must insist you to check is the “Save also on the camera’s memory card” that way you have a backup in case something goes wrong while doing this. You can never be too careful.

One last setting, make sure you choose None on the Linked software. This way after you take the picture, no application will be launched. Lightroom will be open when you start taking pictures. This is to avoid the mac going crazy!

This is for both Nikon and Canon users. Now we got all the settings, except the ones from Lightroom ready. Launch Lightroom (doesn’t matter if you have the camera connected) and open Lightroom. Under the File menu go to Auto Import and choose Auto Import Settings. Here you choose your Watched folder (which we created earlier) and select your destination to copy those files to. If you have multiple catalogs as I do, make sure to check those settings for the Destination folder. The Watched folder gets picked up, but the Destination folder just lists the users’ Pictures folder. I create a folder per catalog inside that project folder. You can also add the Metadata information and Keywords.

Now that we’re ready with the settings, go once more to File> Auto Import and Enable Auto Import and Start Shooting!

One thing I’ve noticed is that it speeds up my working process. I no longer need to leave the studio and get to my desk, download the pictures, get them into Lightroom and decide if they are going to work or not… All around, a great Christmas present.
A friend of mine mentioned this on Facebook:
I have Bridge specified as linked software and I only change the destination folder in EOS utility, per project, on the fly. Works like a charm (on a Mac).
If you rely on Bridge and Photoshop only, this is also a great way of getting your tethered photography going!